
L and I have a room in our house that wears many hats. It is a space that serves as an office, dressing room and storage. One wall has two racks of clothes, another wall has a bureau, the third wall has my all time favorite storage containers stacked to the ceiling, and the last wall had a small bookcase filled with all of our office supplies. Unfortunately, that cluttered and dark bookshelf was the first thing I would see every time I walked into the room making it a huge eyesore. Because this space (which I lovingly refer to as my woman cave) is undergoing a makeover so that it will eventually be a cozy and bright oasis, this bookshelf was the perfect place to start!
If you want to skip past reading this post in its entirety, I made a short clip that shows the project from start to finish with all of my mistakes along the way!
I guess you could say I did a lot of homework when deciding what type of furniture I wanted, but I was most intrigued by the versatility and affordability that the Ikea Besta system offered (this is not sponsored, btw!). When planning this project out in my head I knew that I wanted it to be bright, mirrored, chrome, I wanted it big enough to house our printer, I wanted it to have adjustable shelves, I wanted to have the option to add to it down the line, and most importantly I wanted it to be a cabinet with closing doors so that I could hide the mess clutter. I also wanted it to be somewhere under the $300 mark. It was no surprise that I couldn't really pin down what I was looking for. SO... to Ikea it was! ...and when I say "to Ikea" I'm referring to the website because I can assure you there are no Ikea's east of Boston where I now live.

Because it's Ikea, you do have to order all of the parts individually. Don't assume that the doors come with hinges, or the cabinet come with feet and a support leg... those are all extra pieces that you should add to your shopping cart. I purchased:
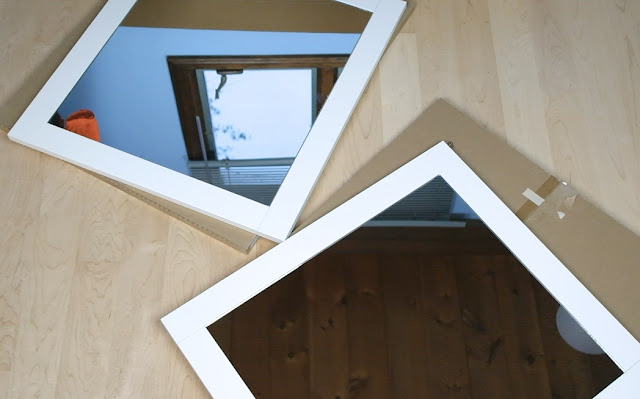
I love the look and brightness of mirrored furniture which is why I really, really wanted to incorporate it on this cabinet. I took both of the HANVIKEN doors to a local glass shop and they kindly cut two mirrors to size and glued them onto the doors so that they were flush with the trim. I was thrilled. If you don't have a local glass store, I'm sure Lowe's or Home Depot would work as well, however you may need to glue the mirrors yourself.

The Besta cabinet comes with what I believe to be flat "feet" that you can screw onto the bottom of each corner so that the cabinet is not sitting directly on the floor. I knew I wanted it to be lifted a little and I knew I wanted the feet to be chrome to match the handles so I purchased two packages of NANNARP legs to dress it up a little. I do plan on eventually adding another Besta cabinet on top which is why I also purchased the support leg to help give it a little stability should I add on to the cabinet down the road. This isn't really necessary, however I would like to add to it eventually.


The next customization that I made was dressing up the two panels that slide in the back of the cabinet. I wanted it to have a little pizazz as well as tie into the chrome accents that I was adding to it. I purchased come metallic wallpaper from an online store, aliexpress, which I have never heard of before... but was pleasantly surprised by the speedy shipping. I definitely purchased way more wallpaper than I needed for this project but am sure I will be able to find another use for it down the road. I glued it down with some 3M spray adhesive which ended up making a huge mess. If I were to do this again, I would try to use something a little more controllable and less messy. This stuff gets everywhere. By the end of this I had glued every speck of dirt from the floor onto my fingers!

Unfortunately, when I went to slide the panels into the back of the cabinet, they kept catching and ended up ripping. This made me very sad... especially after the whole 3M glue fiasco!

SO! Back to the drawing board I went, this time I covered the entire panel except for where it would be sliding on the sides.


I ended up putting wallpaper on both sides of the panel which meant that the back of the cabinet got a little facelift! What a beautiful surprise, I love it!

I wanted the cabinet to have a little bit of a dramatic flair which is why I purchased these 15" Liberty Steel Bar Pulls from Home Depot for the front of the doors. They also tie in nicely with the feet and wallpaper that I added to the cabinet earlier.

I'm no master measurer, however once I figured out the correct measurements for one of the doors, I stacked them on top of each other and drilled through both of them to get a consistent and even measurement. This probably isn't the most proper measurement technique, however, it worked for me!

It was important that we use this new space to store our printer, so we drilled a small hold towards the bottom of one of the panels to feed the printer cord through to the outlet.

I haven't quite organized it how I would like to see it organized, however, here is an idea as to how we are able to store all of our office supplies so that they are out of sight, yet still functional! The lower left shelf has a container filled with cords, cameras, cables... you name it! The lower right shelf has our printer, binders and my favorite zippered poly envelopes. Above that I have several sterilite containers filled with paper, envelopes, ink, manuals, pen, paper, tape, etc., and the other top shelf is a mixed bag of other random items (greeting cards, notepads, stapler, labeler).

I'm pretty please with how everything turned out! My only complaint would be that the door on the left is slightly higher than the one on the right and it's my own fault. One day when I am feeling ambitious I will fix it by loosening the screws. Over all though, I am loving the clean, crisp and bright aesthetics that it brings to this multi-purpose and slightly busy room.

Because it's Ikea, you do have to order all of the parts individually. Don't assume that the doors come with hinges, or the cabinet come with feet and a support leg... those are all extra pieces that you should add to your shopping cart. I purchased:
- IKEA Besta Frame - $60
- (2) HANVIKEN doors - $50
- (2) BESTA shelves - $20
- (2) packages of NANNARP legs (4 legs total) - $30
- (1) BESTA support leg - $10
- (2) packages of BESTA soft closing hinges (4 hinges total) - $20
Other items purchased for this project that were not from Ikea included:
- (2) custom cut mirrors - $56
- Metallic wallpaper - $25
- 3M Super 77 Spray Adhesive - $5
- (2) Liberty Brushed Steel Bar Pulls - $15
The total for all of the products used for this project cost me $281 (not including any shipping expenses).

I love the look and brightness of mirrored furniture which is why I really, really wanted to incorporate it on this cabinet. I took both of the HANVIKEN doors to a local glass shop and they kindly cut two mirrors to size and glued them onto the doors so that they were flush with the trim. I was thrilled. If you don't have a local glass store, I'm sure Lowe's or Home Depot would work as well, however you may need to glue the mirrors yourself.

The Besta cabinet comes with what I believe to be flat "feet" that you can screw onto the bottom of each corner so that the cabinet is not sitting directly on the floor. I knew I wanted it to be lifted a little and I knew I wanted the feet to be chrome to match the handles so I purchased two packages of NANNARP legs to dress it up a little. I do plan on eventually adding another Besta cabinet on top which is why I also purchased the support leg to help give it a little stability should I add on to the cabinet down the road. This isn't really necessary, however I would like to add to it eventually.


The next customization that I made was dressing up the two panels that slide in the back of the cabinet. I wanted it to have a little pizazz as well as tie into the chrome accents that I was adding to it. I purchased come metallic wallpaper from an online store, aliexpress, which I have never heard of before... but was pleasantly surprised by the speedy shipping. I definitely purchased way more wallpaper than I needed for this project but am sure I will be able to find another use for it down the road. I glued it down with some 3M spray adhesive which ended up making a huge mess. If I were to do this again, I would try to use something a little more controllable and less messy. This stuff gets everywhere. By the end of this I had glued every speck of dirt from the floor onto my fingers!

Unfortunately, when I went to slide the panels into the back of the cabinet, they kept catching and ended up ripping. This made me very sad... especially after the whole 3M glue fiasco!

SO! Back to the drawing board I went, this time I covered the entire panel except for where it would be sliding on the sides.


I ended up putting wallpaper on both sides of the panel which meant that the back of the cabinet got a little facelift! What a beautiful surprise, I love it!

I wanted the cabinet to have a little bit of a dramatic flair which is why I purchased these 15" Liberty Steel Bar Pulls from Home Depot for the front of the doors. They also tie in nicely with the feet and wallpaper that I added to the cabinet earlier.

I'm no master measurer, however once I figured out the correct measurements for one of the doors, I stacked them on top of each other and drilled through both of them to get a consistent and even measurement. This probably isn't the most proper measurement technique, however, it worked for me!

It was important that we use this new space to store our printer, so we drilled a small hold towards the bottom of one of the panels to feed the printer cord through to the outlet.

I haven't quite organized it how I would like to see it organized, however, here is an idea as to how we are able to store all of our office supplies so that they are out of sight, yet still functional! The lower left shelf has a container filled with cords, cameras, cables... you name it! The lower right shelf has our printer, binders and my favorite zippered poly envelopes. Above that I have several sterilite containers filled with paper, envelopes, ink, manuals, pen, paper, tape, etc., and the other top shelf is a mixed bag of other random items (greeting cards, notepads, stapler, labeler).

I'm pretty please with how everything turned out! My only complaint would be that the door on the left is slightly higher than the one on the right and it's my own fault. One day when I am feeling ambitious I will fix it by loosening the screws. Over all though, I am loving the clean, crisp and bright aesthetics that it brings to this multi-purpose and slightly busy room.
What's your favorite IKEA hack!?


No comments:
Post a Comment